React Native - Moments API Integration Guide
The Moments API enables you to integrate dynamic, personalized offer experiences directly into your React Native application. This guide walks you through how to fetch offers, build the UI to display them, and track user interactions using event beacons.
By the end of this guide, you’ll be able to:
- Configure your project for Moments API access
- Fetch offers using the provided API
- Render offers using custom React Native components
- Track and report user engagement events such as impressions, dismissals, and clicks
To explore a working example, see the MomentScience React Native demo on GitHub.
Prerequisites
Before diving into the integration process, there are a few preliminary steps you need to take
- Obtain an API key: Before you start the integration, you must acquire a unique API key. Follow the instructions provided here to obtain your key.
- Verify Supported Versions: Ensure your project dependencies meet these requirements.
- React Native: 0.73 or higher
- React: 18.0.0 or higher
- Install Required Packages: Run the following command in your project directory to install the necessary dependencies:
npm install axios react-native-config react-native-device-info- Axios: for making HTTP requests.
- react-native-device-info: for accessing device details.
- react-native-config: for accessing environment variables via a .env file.(optional)
- Add Android Internet Permission: In your android/app/src/main/AndroidManifest.xml, add the following line to allow network requests:
<uses-permission android:name="android.permission.INTERNET" />- Add Android Manifest Queries Block: For Android 11and above, add the following <queries> block outside the <application> tag in your AndroidManifest.xml to allow opening offer URLs in an external browser:
<queries>
  <intent>
    <action android:name="android.intent.action.VIEW" />
    <category android:name="android.intent.category.BROWSABLE" />
    <data android:scheme="https" />
  </intent>
</queries>
Integration Steps
The Moments API delivers personalized offer data based on a set of query parameters and request payload values. In this section, you’ll implement a utility function to retrieve and normalize offers for use in your UI.
For complete details on Moments API, refer to the Moments API documentation.
Step 1: Fetch Offers
To retrieve personalized offers from the Moments API, make a POST request to the https://api.adspostx.com/native/v4/offers.json endpoint.
// API_BASE_URL=https://api.adspostx.com/native/v4

const fetchMomentOffers = async (
  apiKey,
  queryParameters = {},
  payload = {},
) => {
  try {
    const userAgent = payload.ua ?? (await getUserAgent());

    const headers = {
      'Content-Type': 'application/json',
      Accept: 'application/json',
      'User-Agent': userAgent,
    };

    const allQueryParameters = {
      api_key: apiKey,
      ...queryParameters,
    };

    const filteredQueryParameters = Object.fromEntries(
      Object.entries(allQueryParameters).filter(([, v]) => v != null)
    );

    const filteredPayload = Object.fromEntries(
      Object.entries(payload).filter(([, v]) => v != null)
    );

    const queryString = new URLSearchParams(filteredQueryParameters).toString();
    const apiUrl = `${Config.API_BASE_URL}/offers.json${queryString ? `?${queryString}` : ''}`;

    const response = await axios.post(apiUrl, filteredPayload, { headers });
    return response;
  } catch (error) {
    Logger.log('[fetchMomentOffers] Error:', error);
    Logger.log('[fetchMomentOffers] Details:', error.response || error.request || error.message);
    throw error;
  }
};
Parameters
Name | Type | Description |
|---|---|---|
apiKey | String | Your MomentScience API key. Required for authentication. |
queryParameters | Object | Optional URL query parameters such as loyaltyboost, creative , campaignId or any custom key supported by your API integration. |
payload | Object | Request body containing user-specific data (e.g. ua, adpx_fp). |
Common Payload Fields
Field | Type | Description |
|---|---|---|
adpx_fp | String | A unique identifier for the end user |
pub_user_id | String | A unique, non-PII identifier for the end user. |
placement | String | An attribute that represents the specific page, section, or location where the Offer Unit was triggered |
dev | String | Set to "1" to enable test mode. |
ua | String | The user-agent string. |
Returns: A successful response returns a JSON object containing:
- An array of offers
- Metadata such as tracking beacons, creative assets, and eligibility flags
- Optional styling rules
See OffersService.js , useOffers.js , and OfferModel.js in the demo app for examples of how to request, consume, and structure offer data.
Step 2: Build the Offer UI
After retrieving offer data, the next step is to design a user interface that presents the offers and captures user actions such as claiming or dismissing them.
The UI components shown below are taken from our demo app and serve as reference implementations only. You are free to build your own components based on your app’s design system and platform conventions.
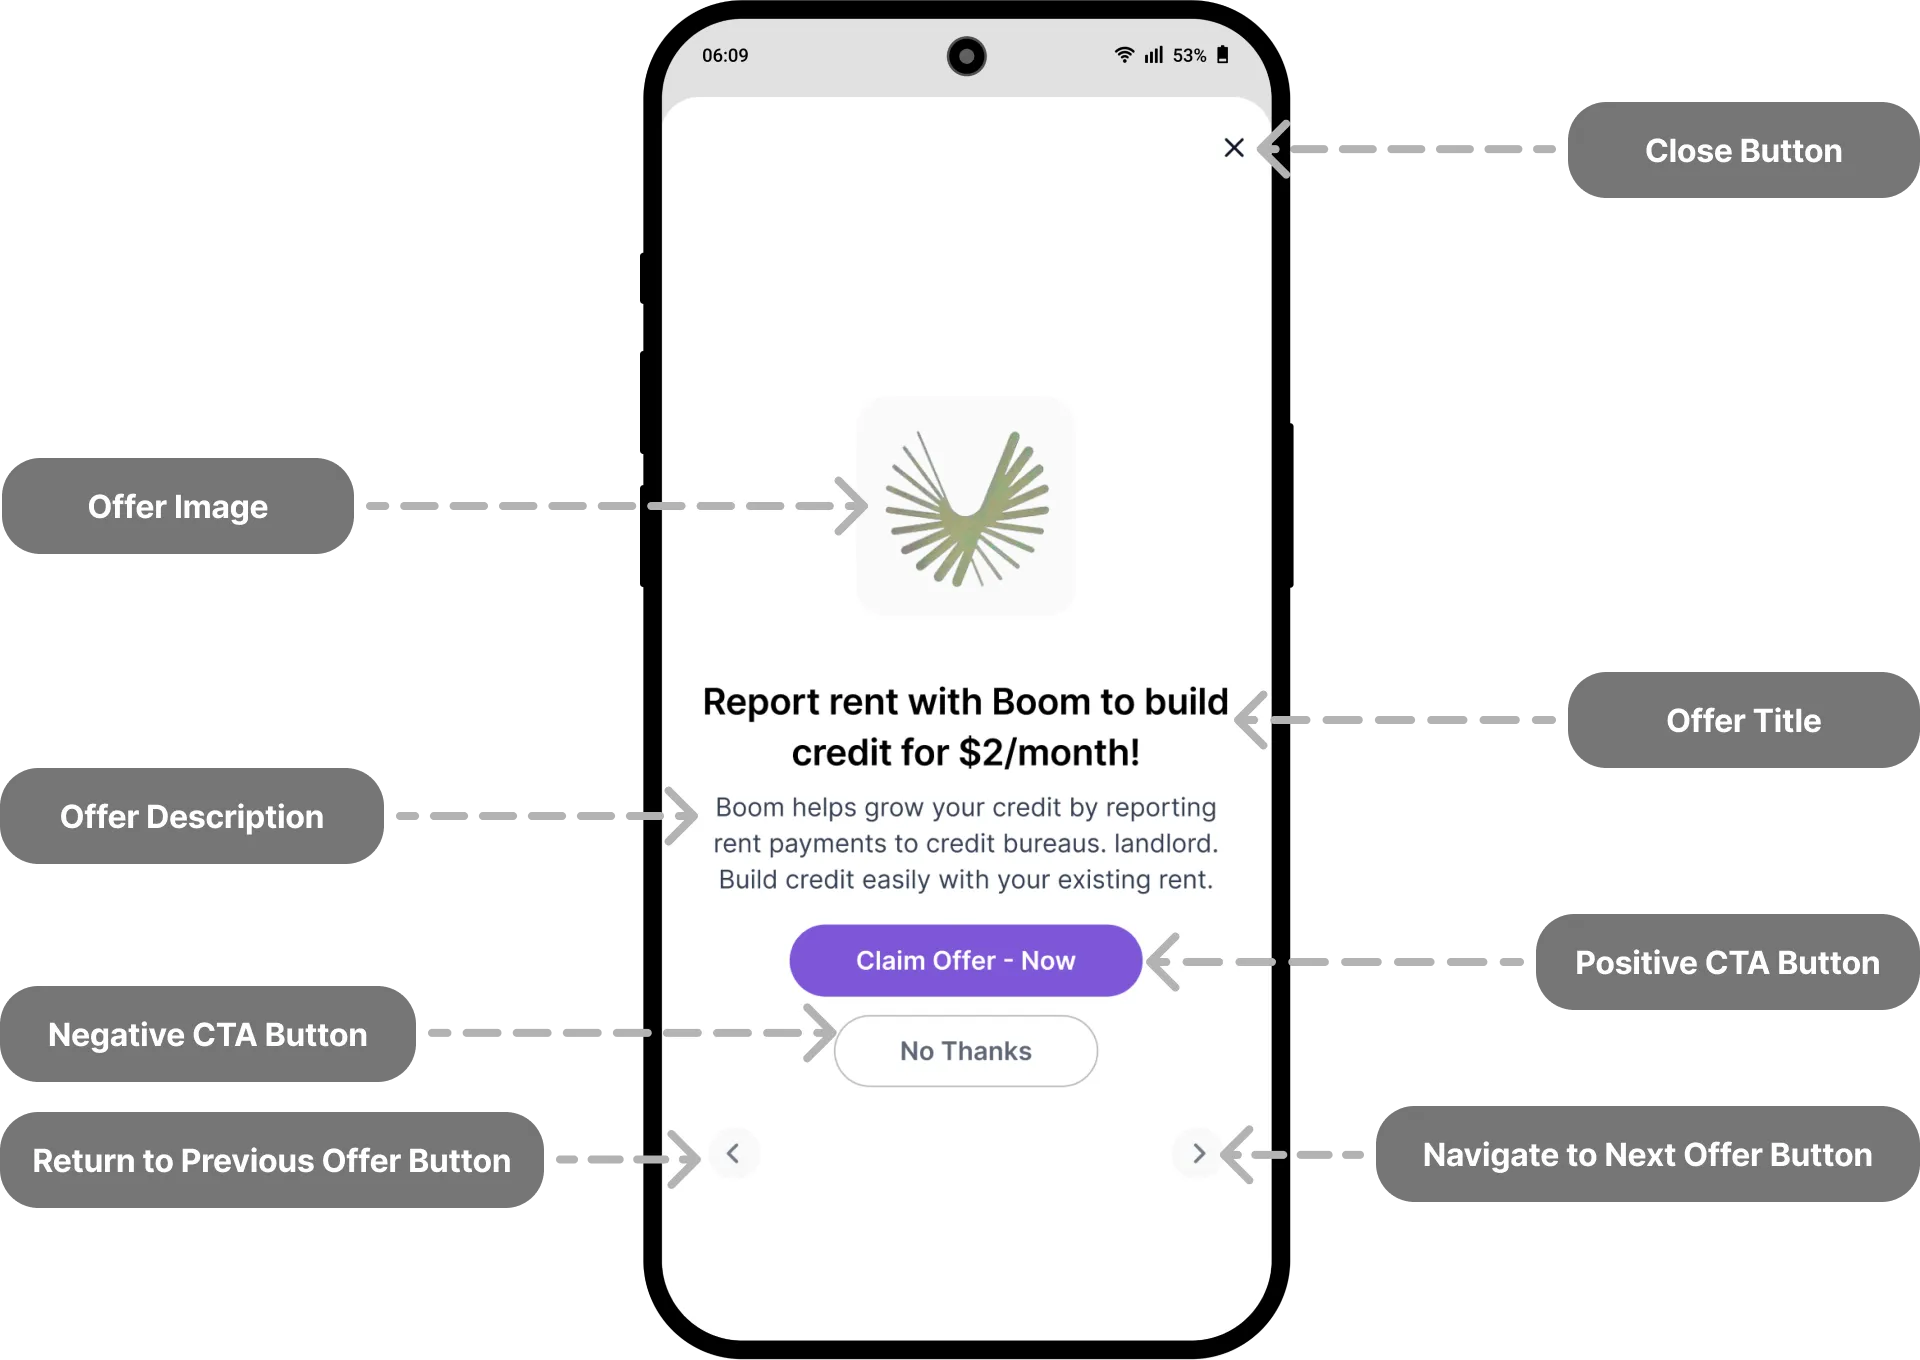
For a detailed explanation of how each field in the offer object is used refer to the Offer Anatomy documentation. This guide will help you understand how to map API fields to UI components and apply dynamic styling correctly.
Offer Container UI
Use the OfferContainerView to manage and display a sequence of offers. This component handles navigation, dynamic styling, and user interactions.
<OfferContainerView
  offers={offers}
  OnCloseOfferCTA={handleOfferClose}
  apiStyles={apiStyles}
/>
Props:
Property | Type | Description |
|---|---|---|
offers | Array | List of offer objects retrieved from the API. |
OnCloseOfferCTA | Function | Callback triggered when the offer container is closed. Receives two parameters: currentIndexand shouldFirePixel. |
apiStyles | Object | UI styles returned from the API for dynamic theming. |
See OfferContainerView.js in the demo app for a working implementation.
Individual Offer UI
Use the OfferView component to render a single offer and handles user interactions, including:
- Tapping the offer image
- Clicking CTA buttons
- Triggering pixel events
<OfferView
  title={currentOffer.title} // Offer headline
  description={currentOffer.description} // Offer description
  imageURL={currentOffer.image} // URL of the offer creative (image)
  clickURL={currentOffer.click_url} // URL to open on image or positive CTA tap
  onImageCTA={handleImageCTA} //Called when the offer image is tapped
  positiveCTA={currentOffer.cta_yes} // Label for the primary CTA button
  onPositiveCTA={handlePositiveCTA} // Called when the primary CTA is tapped
  negativeCTA={currentOffer.cta_no} // Label for the secondary CTA button
  onNegativeCTA={handleNegativeCTA} // Called when the secondary CTA is tapped
  apiStyles={apiStyles?.offerText} // Optional styling applied to text or CTA components
/>
See OfferView.js and useOffers.js in the demo app for a working implementation.
Step 3: Track User Interactions
To measure user engagement and support advertiser attribution, fire tracking beacons (pixel URLs) at key moments in the user journey. The fireOfferPixelutility sends HTTP GETrequests to tracking URLs provided in the offer metadata.
const fireOfferPixel = async (url) => {
  if (!url) return;

  try {
    Logger.log('Inside fire pixel:', url);
    const response = await axios.get(url);
    Logger.log('Fire pixel Success:', response.data);
  } catch (error) {
    Logger.log('Fire pixel Error:', error);
  }
};
When to Fire Beacons
Use fireOfferPixelat the following points in the offer flow:
- When the Offer is Displayed: Fire both pixeland adv_pixel_urlif they exist.
fireOfferPixel(offers[currentOfferIndex]?.pixel);

fireOfferPixel(offers[currentOfferIndex]?.adv_pixel_url);- When the User Taps negative CTA: Fire the no_thanks_clickbeacon if available.
fireOfferPixel(offers[currentIndex].beacons?.no_thanks_click);- When the Offer Container is Closed: Fire the close beacon to indicate the user exited the offer sequence.
fireOfferPixel(offers[currentIndex].beacons?.closeSee useOfferContainer.js and useOffers.js in the demo app for a working implementation.
Next Steps
We recommend that you go through the Moments API Implementation Checklist to verify your integration. Completing this checklist ensures that all best practices and requirements are met for a successful Moments API deployment.
📢 If you're running into any issues while going through the integration process, feel free to contact us at [email protected].