Flutter - Moments API Integration Guide
Overview
The Moments API allows you to display personalized offers to users inside your Flutter application. This guide explains how to integrate the API, from setup to rendering offers and tracking user actions.
By following this integration guide, you’ll be able to:
- Fetch real-time, targeted offers based on user context
- Present these offers using your own custom UI or prebuilt reference components
- Track user responses and impressions for reporting and optimization
To explore a working example, see the MomentScience Flutter demo on GitHub.
Prerequisites
Before you begin, ensure the following requirements are met:
- API Key: Before you start the integration, you must acquire a unique API key. Follow the instructions provided here to obtain your key.
- Install dependency packages: Add the following dependencies to your pubspec.yaml file:
dependencies:
  http: ^1.4.0          # API requests
  url_launcher: ^6.3.1  # Open links in an external browser
  tinycolor2: ^3.0.1    # Convert and manage hex color values
  provider: ^6.0.5      # optional: for better state management
- Enable Internet Access: Add the following permission to your Android app’s manifest android/app/src/main/AndroidManifest.xml
<uses-permission android:name="android.permission.INTERNET" />Integration Steps
The Moments API delivers personalized offer data based on a set of query parameters and request payload values. In this section, you’ll implement a utility function to retrieve and normalize offers for use in your UI.
For complete details on Moments API, refer to the Moments API documentation.
Step 1: Fetch Offers
In this step, you’ll build a utility function that sends a POST request to the Moments API (native/v4/offers.json) and returns personalized offers based on the given user context.
Instructions
- Define Base URL and Endpoint: At the top of offer_service.dart, define the API constants:
const String _baseUrl = 'https://api.adspostx.com/native/v4';
const String _path = 'offers.json';- Implement loadOffersFunction: Paste the following function.
import 'dart:convert';
import 'package:http/http.dart' as http;
import '../utils/user_agent_util.dart';

  Future<OfferResponse> loadOffers({
    required String apiKey,
    String? loyaltyBoost,
    String? creative,
    String? campaignId,
    bool isDevelopment = false,
    Map<String, String> payload = const {},
  }) async {
    if (apiKey.isEmpty) {
      throw Exception('API Key cannot be empty');
    }

    // Validate loyaltyBoost if provided
    if (loyaltyBoost != null) {
      final validLoyaltyBoostValues = ['0', '1', '2'];
      if (!validLoyaltyBoostValues.contains(loyaltyBoost)) {
        throw Exception('loyaltyBoost must be one of these values: 0, 1, or 2');
      }
    }

    // Validate creative if provided
    if (creative != null) {
      final validCreativeValues = ['0', '1'];
      if (!validCreativeValues.contains(creative)) {
        throw Exception('creative must be either 0 or 1');
      }
    }

    // Construct the URI with query parameters.
    final queryParams = {'api_key': apiKey};

    // Add optional parameters only if they are provided
    if (loyaltyBoost != null) {
      queryParams['loyaltyboost'] = loyaltyBoost;
    }
    if (creative != null) {
      queryParams['creative'] = creative;
    }
    if (campaignId != null) {
      queryParams['campaignId'] = campaignId;
    }

    final Uri uri = Uri.parse('$_baseUrl/$_path').replace(queryParameters: queryParams);

    // Prepare the payload, adding the development flag if needed.
    final Map<String, String> updatedPayload = Map.from(payload);
    if (isDevelopment) {
      updatedPayload['dev'] = '1';
    }

    try {
      // Prepare headers with user agent
      final headers = {
        'Content-Type': 'application/json',
        'Accept': 'application/json',
        'User-Agent': payload['ua'] ?? UserAgentUtil.getUserAgent(),
      };

      // Make the POST request to the offers API with timeout.
      final response = await http
          .post(uri, headers: headers, body: jsonEncode(updatedPayload))
          .timeout(const Duration(seconds: 30));

      // If the response is successful, decode and return as typed model.
      if (response.statusCode == 200) {
        final jsonData = jsonDecode(response.body) as Map<String, dynamic>;
        return OfferResponse.fromJson(jsonData);
      } else {
        // Throw an exception for non-200 responses.
        throw Exception('API Error: ${response.statusCode} - ${response.body}');
      }
    } on TimeoutException {
      // Handle timeout specifically
      throw Exception('Request timed out. Please check your connection and try again.');
    } catch (e) {
      // Catch and rethrow any errors during the request.
      throw Exception('Error making API call: $e');
    }
  }
- Use the Function in Your App: Call the loadOffers() function anywhere in your app where you need to fetch offers. For example:
final offers = await loadOffers(
  apiKey: 'YOUR_API_KEY',
  payload: {
    'adpx_fp': 'unique_device_fp',
    'pub_user_id': 'user123',
    'placement': 'checkout_success',
  },
  loyaltyBoost: '0',
  creative: '0',
  isDevelopment: true, // do not use 'true' in PROD code.
);
Notes on Parameters
Parameter | Description |
|---|---|
apiKey | Your unique API key from MomentScience |
payload | Context about the user and environment (see below) |
loyaltyBoost | 0, 1, or 2 to tune reward targeting |
creative | 0 or 1 to control if creative assets are returned |
campaignId | Optional ID for tracking a specific campaign |
isDevelopment | Set to true to enable dev-mode responses. |
Common Payload Fields
Field | Type | Description |
|---|---|---|
adpx_fp | String | Device fingerprint or session ID |
pub_user_id | String | A unique, non-PII identifier for the end user. This value links offers to individual users and must remain consistent across sessions and devices. |
placement | String | Location in app where the offer is triggered (e.g., cart, home) |
ua | String | User-Agent String |
dev | String | Use "1" to return test offers. (Note: If you are passing isDevelopment value in loadOffers function then you don't need to pass dev in payload.) |
See offer_service.dart and user_agent_util.dart in the demo app for a working implementation.
Step 2: Build the Offer UI
After retrieving offer data, you need to design a user interface to present the offers and handle user actions such as claiming or dismissing them.
The UI example provided below uses OfferContainerView OfferView offer_viewmodel.dart from our demo app. These are reference implementations only, you are free to implement your own UI components based on your app's design requirements and platform conventions.
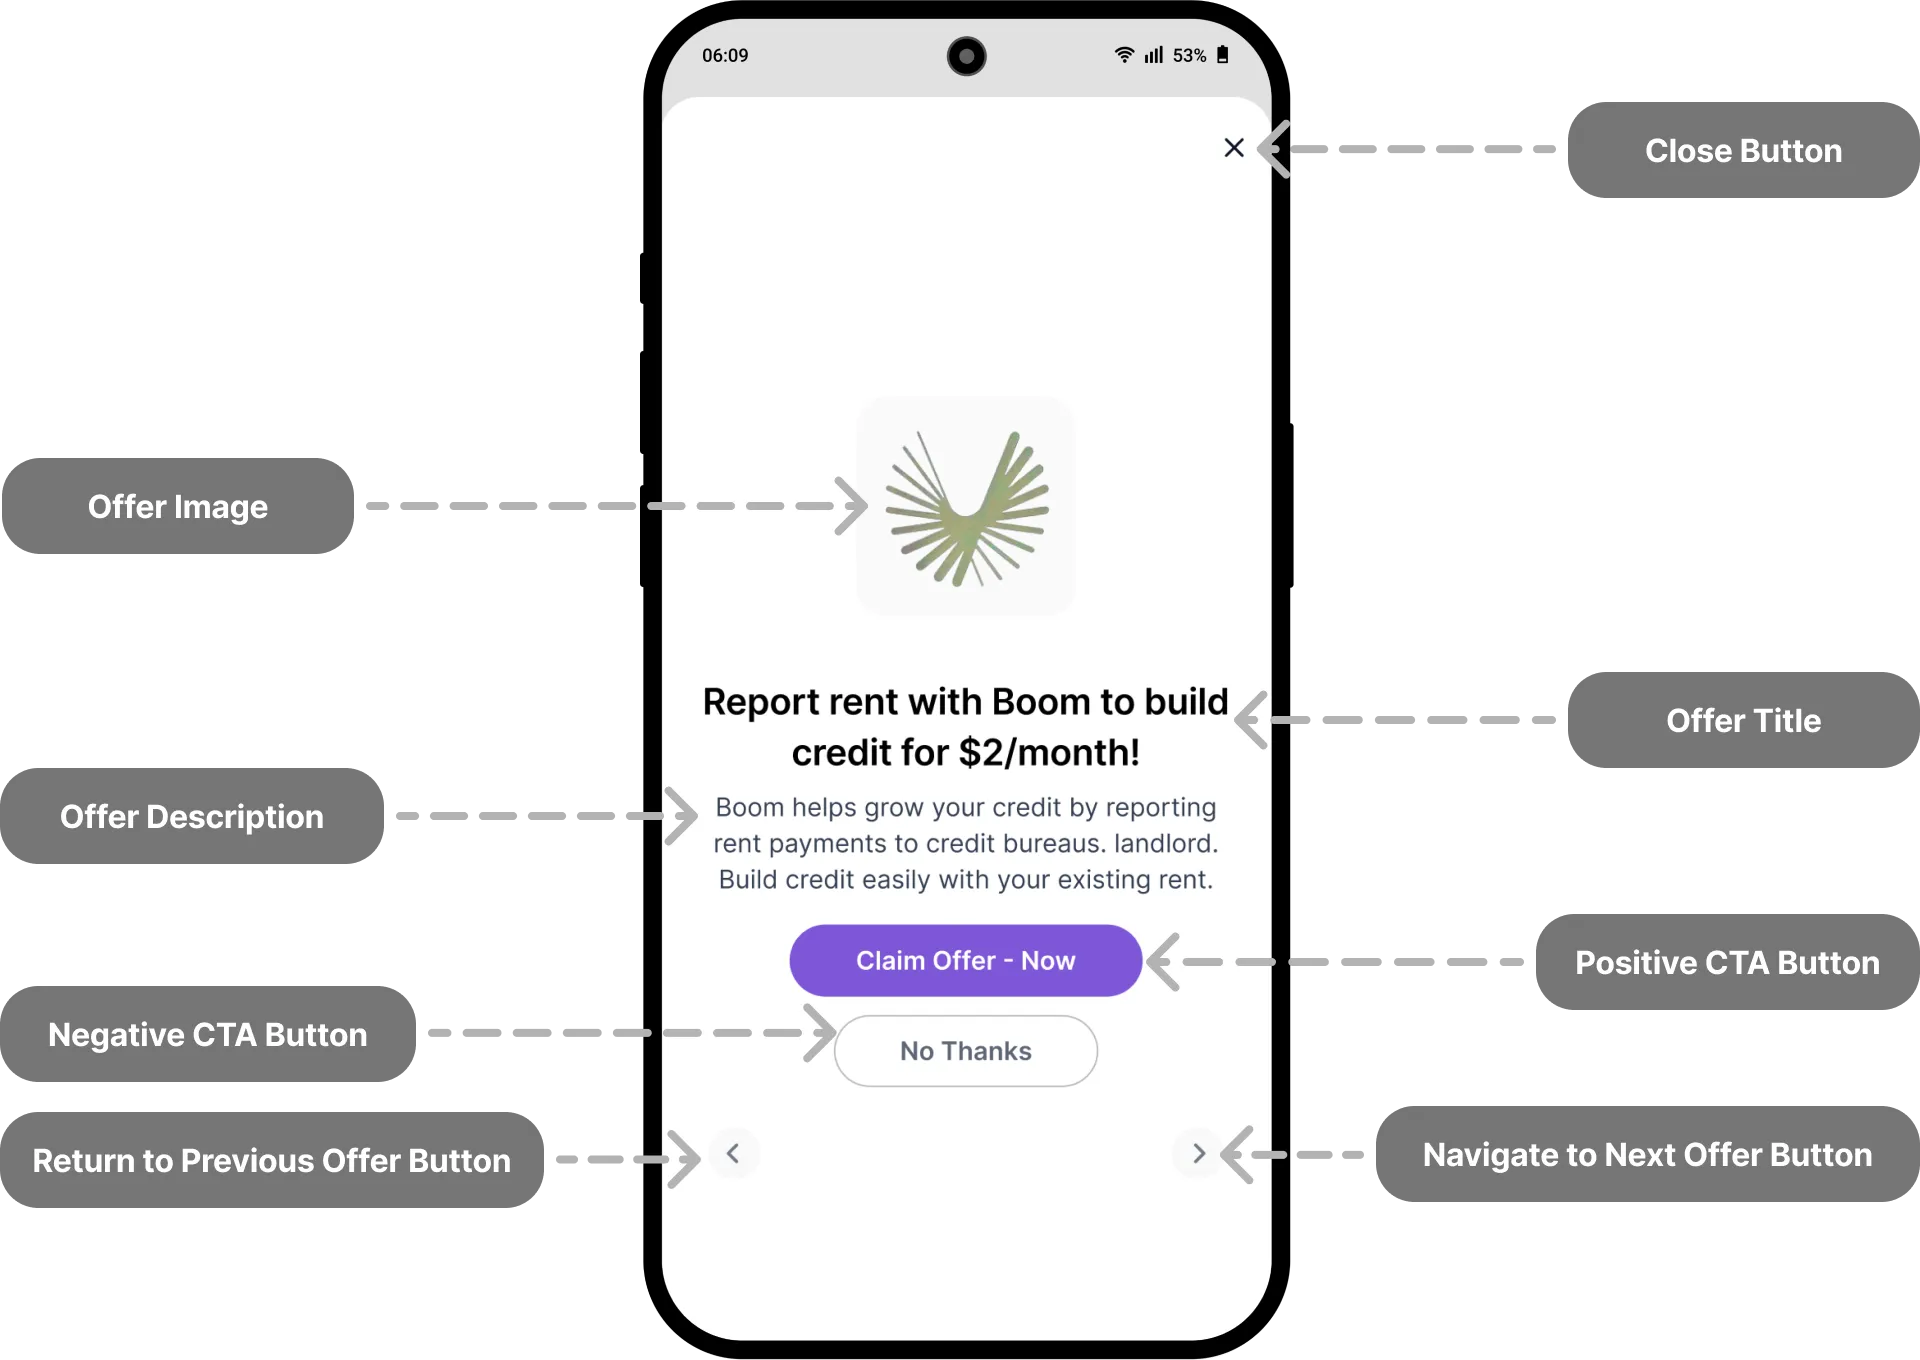
For a detailed explanation of how each field in the offer object is used refer to the Offer Anatomy documentation. This guide will help you understand how to map API fields to UI components and apply dynamic styling correctly.
Offer Container UI
The OfferContainerView displays multiple offers in sequence and manages user navigation, loading, and error states.
OfferContainerView(offers: ary_Of_Offers)Parameter:
Name | Type | Description |
|---|---|---|
offers | List | List of offers (decoded JSON) to be displayed |
See offer_container_view.dart and offer_viewmodel.dart in the demp app for a working implementation.
Individual Offer UI
Each offer is displayed using the OfferView widget, which presents offer details such as title, image, description, and call-to-action buttons with dynamic styling. The business logic and state for the offer presentation are managed by the offer_viewmodel.dart.
OfferView(
  title: currentOffer['title'],
  description: currentOffer['description'],
  imageUrl: currentOffer['image'],
  positiveCta: currentOffer['cta_yes'],
  negativeCta: currentOffer['cta_no'],
  onPositivePressed: () {
    _handlePositiveCtaTap(currentOffer);
  },
  onNegativePressed: () {
    _handleNegativeCtaTap(currentOffer);
  },
  // styles from api response.
  styles: apistyles,
)
Parameters:
Name | Type | Description |
|---|---|---|
title | String? | Offer headline |
description | String? | Offer details or body copy |
imageUrl | String? | URL of image to display |
positiveCta | String? | Label for the postive CTA button. |
negativeCta | String? | Label for the negative CTA button. |
onPositivePressed | VoidCallback? | Function to call on positive CTA tap |
onNegativePressed | VoidCallback? | Function to call on negative CTA tap |
styles | OfferStyles? | Styling metadata from API (e.g., button colors, fonts) |
See offer_view.dart and offer_container_view.dart in the demo app for a working implementation.
If you prefer to use your own layout, styling, or framework-specific widgets, you can:
- Parse the offer response manually.
- Use the Offer Anatomy documentation to map fields like title, image, cta_yes, etc.
- Apply any visual styling or logic defined in your own architecture.
This approach gives you full control over the user experience, while still integrating with the core Moments API logic.
Step 3: Track User Interactions
To monitor engagement and ensure accurate analytics, send tracking requests when users interact with offers. This includes impressions, dismissals, and CTA clicks.
- Create a Function to Fire Tracking Beacons: Define a utility function to send tracking pixels via HTTP GET requests
 Future<void> sendTrackingRequest(String url) async {
    if (url.isNotEmpty) {
      try {
        await _apiService.sendRequest(url);
        debugPrint('🐤 Sent tracking request to: $url');
      } catch (e) {
        debugPrint('Error sending tracking request to $url: $e');
      }
    }
  }
- Track When an Offer is Displayed: When rendering an offer, send impression pixels
final pixel = offer.pixel;
    if (pixel != null && pixel.isNotEmpty) {
      unawaited(sendTrackingRequest(pixel));
    }

final advPixelUrl = offer.advPixelUrl;
    if (advPixelUrl != null && advPixelUrl.isNotEmpty) {
      unawaited(sendTrackingRequest(advPixelUrl));
    }
- Track When the Offer Container is Closed: Send the "close" beacon when a user dismisses the offer container
Future<void> handleCloseAction(dynamic offer) async {
    final closeBeacon = offer.beacons?.close;
    if (closeBeacon != null && closeBeacon.isNotEmpty) {
      unawaited(sendTrackingRequest(closeBeacon));
    }
}- Track When the Negative CTA is Clicked: Fire the no_thanks_click beacon if a user taps on negative CTA.
    final noThanksBeacon = offer.beacons?.noThanksClick;
    if (noThanksBeacon != null && noThanksBeacon.isNotEmpty) {
      unawaited(sendTrackingRequest(noThanksBeacon));
    }
See offer_viewmodel.dart in the demo app for a working implementation.
Next Steps
We recommend that you go through the Moments API Implementation Checklist to verify your integration. Completing this checklist ensures that all best practices and requirements are met for a successful Moments API deployment.
📢 If you're running into any issues while going through the integration process, feel free to contact us at [email protected]